初见网络爬虫
BeautifulSoap 简介
1 | from urllib.request import urlopen |
调用 bsObj.tagName 只能获取页面中的第一个指定的标签。
可靠的网络连接
1 | from urllib.request import urlopen |
复杂HTML解析
不是一直都要用锤子
在面对埋藏很深或格式不友好的数据时, 千万不要不经思考就写代码,一定要三思而后行:
寻找“打印此页”的链接,或者看看网站有没有 HTML 样式更友好的移动版(把自己的请求头设置成处于移动设备的状态,然后接收网站移动版)。
寻找隐藏在 JavaScript 文件里的信息。要实现这一点,你可能需要查看网页加载的JavaScript 文件。 我曾经要把一个网站上的街道地址(以经度和纬度呈现的)整理成格式整洁的数组时,查看过内嵌谷歌地图的 JavaScript 文件,里面有每个地址的标记点。
虽然网页标题经常会用到,但是这个信息也许可以从网页的 URL 链接里获取。
如果你要找的信息只存在于一个网站上, 别处没有,那你确实是运气不佳。如果不只限于这个网站, 那么你可以找找其他数据源。有没有其他网站也显示了同样的数据?网站上显示的数据是不是从其他网站上抓取后攒出来的?
再端一碗
1 | from urllib.request import urlopen |
findAll和find
最常用的两个函数:
attributes, recursive, text, limit, keywords)``` 1
2
2. ```find(tag, attributes, recursive, text, keywords)
1 | bs.findAll(['p', 'span'], {'class': 'green'}, text='the prince', id='text' ) |
text: 筛选内容与text完全匹配的标签
recursive:设置为 True, findAll 就会查找标签参数的所有子标签,以及子标签的子标签。为 False, findAll 就只查找文档的一级标签
limit: 只用于findAll,前x项,按照网页上的顺序
keywords: 选择特定属性的标签,如id=’text’。冗余功能,完全可以用其他技术替代。findAll(id=”text”),等同于findAll(“”,{“id”:”text”})。偶尔还会出现问题,比如class=”class”就会错误,因为class是关键字
其他BeautifulSoup对象
BeautifulSoup对象
标签Tag对象,find和findAll获得
NavigableString对象,表示标签里的文字
Comment对象,注释标签
导航树
1 | from urllib.request import urlopen |
- 子标签和后代标签
bsObj.body.h1 选择了 body 标签后代里的第一个 h1 标签,不会去找 body 外面的标签。
字标签:1
2
后代标签:```bs.find('table', {'id': 'giftList'}).descendants
- 兄弟标签
next_siblings 和 previous_siblings,返回标签后面/前面的兄弟标签
返回表格中除标题行以外的所有行:1
2
单标签版本:```next_sibling``` 和 ```previous_sibling
- 父标签
parent 和 parents
1 | img = bs.find('img', {'src': '../img/gifts/img1.jpg'}) |
正则表达式
1 | a+b{5}(cc)*d? |
a至少出现一次。
b重复5次。
c重复任意欧数次。
d可有可无。
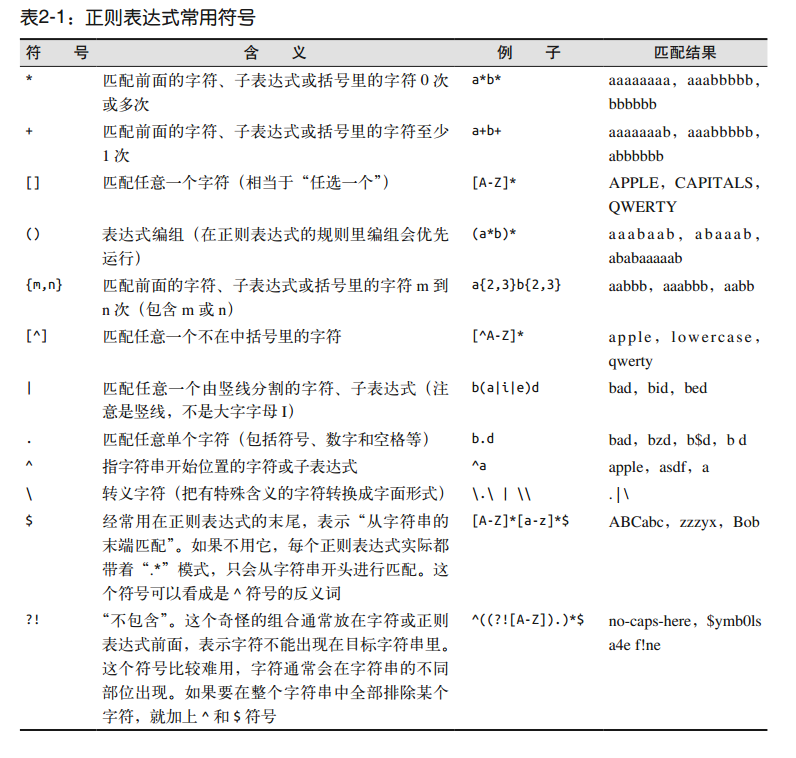
正则表达式常用符号:
正则表达式和BeautifulSoup
1 | for img in bs.findAll('img', {'src': re.compile('\.\./img/gifts/img.*\.jpg')}): |
Lambda表达式
1 | bs.findAll(lambda tag: len(tag.attrs) == 2) |
开始采集
遍历单个域名
1 | from urllib.request import urlopen |
采集整个网站
深网和暗网:
链接收集和链接去重:
1 | from urllib.request import urlopen |
收集整个网站的据:
1 | from urllib.request import urlopen |
Scrapy
- scrapy startproject wikiSpider
- 在spiders文件夹下新建articleSpider.py
- 在items.py文件中定义新的item
每个Item对象表示网站上的一个页面,可以定义不同的条目(url、content、header、image等),这里只演示收集每页的title字段
1 | class Article(scrapy.Item): |
- articleSpider.py
1 | from scrapy.selector import Selector |
- 启动爬虫
在主目录运行命令,scrapy crawl article
- 切换提取信息格式,指定日志文件
1 | scrapy crawl article -s LOG_FILE=wiki.txt -o articles.csv -t csv |
也可以把结果写入文件或数据库中,只要在parse部分增加相应代码即可
使用API
1 | token = "your api key" |
解析json数据:
1 | import json |
抓取维基百科的编辑历史的贡献者IP地址:
1 | from urllib.request import urlopen |
存储数据
媒体文件
存储媒体文件的两种方式:只获取文件URL链接或直接下载源文件。
只获取媒体文件的URL的优缺点:
下载一张图片:
1 | from urllib.request import urlopen |
下载所有具有src属性的资源:
1 | import os |
把数据存储到CSV
创建csv文件:
1 | import csv |
常用场景,获取HTML表格并写入CSV文件:
1 | import csv |
MySQL
1 | import pymysql |
让数据库支持Unicode:
1 | ALTER DATABASE scraping CHARACTER SET = utf8mb4 COLLATE = utf8mb4_unicode_ci; |
抓取并保存到MySQL:
1 | from urllib.request import urlopen |
发邮件:
1 | import smtplib |
Python 有两个包可以发送邮件: smtplib 和 email
email 模块里包含了许多实用的邮件格式设置函数,可以用来创建邮件“包裹”。下面的示例中使用的 MIMEText 对象,为底层的 MIME(Multipurpose Internet MailExtensions,多用途互联网邮件扩展类型)协议传输创建了一封空邮件, 最后通过高层的SMTP 协议发送出去。 MIMEText 对象 msg 包括收发邮箱地址、邮件正文和主题, Python 通过它就可以创建一封格式正确的邮件。
smtplib 模块用来设置服务器连接的相关信息。就像 MySQL 服务器的连接一样,这个连接必须在用完之后及时关闭,以避免同时创建太多连接而浪费资源。
封装一下:
1 | import smtplib |
邮件程序可以做很多事情,可以发送网站访问失败、 应用测试失败的异常情况,也可以在 Amazon 网站上出现了一款卖到断货的畅销品时通知你。
读取文档
纯文本
1 | from urllib.request import urlopen |
对法语文本进行编码显示:
1 | from urllib.request import urlopen |
CSV
读取网络csv文件:
1 | from urllib.request import urlopen |
1 | from urllib.request import urlopen |
读取PDF文件,使用PDFMiner3K库,过程略。
docx
读取微软Word的.docx文件:
1 | from zipfile import ZipFile |
数据清洗
编写代码清洗数据
语言模型n-gram:表示文字或语言中的 n 个连续的单词组成的序列。在进行自然语言分析时,使用 n-gram 或者寻找常用词组, 可以很容易地把一句话分解成若干个文字片段。
1 | from urllib.request import urlopen |
数据标准化:
1 | def ngrams_dict(input, n): |
数据存储后再清洗
使用OpenRefine,过程略。
自然语言处理
概括数据
1 | content = urlopen( |
排除常用单词:
1 | def isCommon(ngram): |
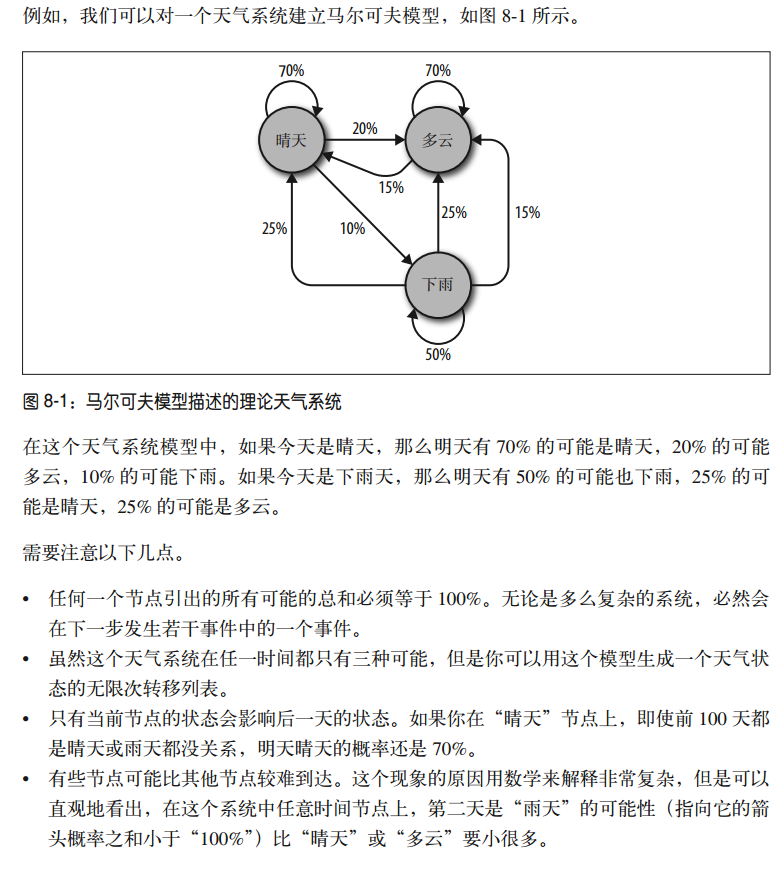
马尔可夫模型
马尔可夫模型:
1 | from urllib.request import urlopen |
穿越网页表单与登录窗口进行采集
Python Requests
Python 的标准库 urllib 为你提供了大多数 HTTP 功能,但是它的 API 非常差。这是因为它是经过许多年一步步建立起来的——不同时期要面对的是不同的网络环境。于是为了完成最简单的任务,它需要耗费大量的工作(甚至要重写整个方法)。
Requests 库就是这样一个擅长处理那些复杂的 HTTP 请求、 cookie、 header(响应头和请求头)等内容的 Python 第三方库。
提交一个基本表单
1 | import requests |
提交文件和图像
1 | import requests |
处理登录和cookie
1 | import requests |
HTTP基本接入认证:
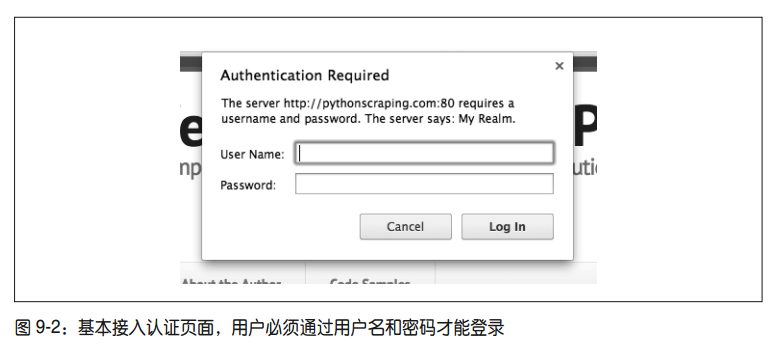
1 | import requests |
采集Javascript
在Python中用Selenium执行JavaScript:
1 | from selenium import webdriver |
隐式等待:
1 | from selenium import webdriver |
WebDriverWait 和 expected_conditions,这两个模块组合起来构成了 Selenium 的隐式等待(implicit wait)。元素被触发的期望条件(expected condition)有很多种,包括:
弹出一个提示框
一个元素被选中(比如文本框)
页面的标题改变了,或者某个文字显示在页面上或者某个元素里
一个元素在 DOM 中变成可见的,或者一个元素从 DOM 中消失了
元素用定位器(locator)指定,By对象选择的策略:
ID:在上面的例子里用过;通过 HTML 的 id 属性查找元素
CLASS_NAME:通过 HTML 的 class 属性来查找元素
CSS_SELECTOR:通过 CSS 的 class、 id、 tag 属性名来查找元素,用 #idName、 .className、 tagName 表示
LINK_TEXT:通过链接文字查找 HTML 的 标签。例如,如果一个链接的文字是“Next”,就可以用 (By.LINK_TEXT, “Next”) 来选择
PARTIAL_LINK_TEXT:与 LINK_TEXT 类似,只是通过部分链接文字来查找
NAME:通过 HTML 标签的 name 属性查找。这在处理 HTML 表单时非常方便
TAG_NAME:通过 HTML 标签的名称查找
XPATH:用 XPath 表达式选择匹配的元素
XPath文档:https://msdn.microsoft.com/zh-cn/zn-CH/enus/library/ms256471
处理重定向
识别一个页面已经完成重定向:从页面开始加载时就“监视 ” DOM 中的一个元素,然后重复调用这个元素直到 Selenium 抛出一个 StaleElementReferenceException 异常。也就是说,元素不在页面的DOM里了。
1 | from selenium import webdriver |
图像识别与文字处理
OCR库
Pillow,Tesseract。
安装:conda install -c simonflueckiger tesserocr pillow
设置训练数据文件路径:setx TESSDATA_PREFIX 'D:\Program Files\Tesseract OCR\'
处理格式规范的文字


tesseract demo.png text:将某个图片的文字识别出来,保存到text.txt文件中
如果图片图片背景有渐变色,文字识别变得困难,可以使用Pillow库创建一个阈值过滤器来去掉渐变的背景色,只把文字流下来,从而利于Tesseract读取。
1 | from PIL import Image |
从网站图片中抓取文字:
1 | import time |
读取验证码与训练Tesseract
首先要把大量的验证码样本下载到一个文件夹里,建议使用验证码的真实结果给每个样本文件命名(即 4MmC3.jpg)。
第二步是准确地告诉 Tesseract 一张图片中的每个字符是什么,以及每个字符的具体位置。这里需要创建一些矩形定位文件(box file),示例:
4 15 26 33 55 0
M 38 13 67 45 0
m 79 15 101 26 0
C 111 33 136 60 0
3 147 17 176 45 0
第一列符号是图片中的每个字符,后面的 4 个数字分别是包围这个字符的最小矩形的坐标(图片左下角是原点 (0,0), 4 个数字分别对应每个字符的左下角 x 坐标、左下角 y 坐标、右上角 x 坐标和右上角 y 坐标),最后一个数字“0”表示图片样本的编号。
制作矩形定位文件的工具,Tesseract OCR Chopper(http://pp19dd.com/tesseract-ocr-chopper/)。
备份一下这个文件夹。
完成所有的数据分析工作和创建 Tesseract 所需的训练文件,一共有六个步骤。
一个 Python 版的解决方案(https://github.com/REMitchell/tesseract-trainer)。
获取验证码提交答案
常用的处理方法就是,首先把验证码图片下载到硬盘里,清理干净,然后用 Tesseract 处理图片,最后返回符合网站要求的识别结果。
1 | from urllib.request import urlopen, urlretrieve |
避开采集陷阱
让网络机器人看起来像人类用户
修改请求头
1 | session = requests.Session() |
处理cookie
1 | from selenium import webdriver |
避免蜜罐
1 | from selenium import webdriver |
问题检查表
如果你已经登录网站却不能保持登录状态,或者网站上出现了其他的“登录状态”异常,请检查你的 cookie。 确认在加载每个页面时 cookie 都被正确调用,而且你的 cookie 在
每次发起请求时都发送到了网站上。
如果你在客户端遇到了 HTTP 错误, 尤其是 403 禁止访问错误,这可能说明网站已经把你的 IP 当作机器人了,不再接受你的任何请求。你要么等待你的 IP 地址从网站黑名单里移除,要么就换个 IP 地址(可以去星巴克上网,或者看看第 14 章的内容)。如果你确定自己并没有被封杀,那么再检查下面的内容:
确认你的爬虫在网站上的速度不是特别快。 快速采集是一种恶习,会对网管的服务器造成沉重的负担,还会让你陷入违法境地, 也是 IP 被网站列入黑名单的首要原因。给你的爬虫增加延迟,让它们在夜深人静的时候运行。切记:匆匆忙忙写程序或收集数据都是拙劣项目管理的表现;应该提前做好计划,避免临阵慌乱
访问者。如果你不确定请求头的值怎样才算合适,就用你自己浏览器的请求头吧还有一件必须做的事情: 修改你的请求头!有些网站会封杀任何声称自己是爬虫的访问者。如果你不确定请求头的值怎样才算合适,就用你自己浏览器的请求头吧
确认你没有点击或访问任何人类用户通常不能点击或接入的信息
用爬虫测试网站
Python 单元测试
为每个单元测试的开始和结束提供 setUp 和 tearDown 函数
提供不同类型的“断言”语句让测试成功或失败
把所有以 test 开头的函数当作单元测试运行,忽略不带 test 的函数
1 | import unittest |
setUp 和 tearDown这两个函数在每个测试方法的开始和结束都会运行一次。
测试维基百科:
1 | from urllib.request import urlopen |
setUpClass函数只在类的初始化阶段运行一次(与每个测试启动时都运行的 setUp 函数不同)。
Selenium 单元测试
1 | from selenium import webdriver |
Selenium 单元测试的时候需要比写 Python 单元测试更加随意,断言语句甚至可以整合到生产代码中。
与网站进行交互:
Selenium 也可以对任何给定元素执行很多操作:
1 | myElement.click() |
动作链:
1 | from selenium import webdriver |
- 鼠标拖放动作
1 | from selenium import webdriver |
- 截屏
1 | from selenium import webdriver |
Python单元测试与Selenium单元测试的选择
Python 的单元测试语法严谨冗长,更适合为大多数大型项目写测试,而 Selenium 的测试方式灵活且功能强大,可以成为一些网站功能测试的首选。两者组合是最佳拍档。
远程采集
Tor代理服务器
洋葱路由(The Onion Router)网络,常用缩写为 Tor,是一种 IP 地址匿名手段。由网络志愿者服务器构建的洋葱路由器网络, 通过不同服务器构成多个层(就像洋葱)把客户端包在最里面。数据进入网络之前会被加密,因此任何服务器都不能偷取通信数据。另外,虽然每一个服务器的入站和出站通信都可以被查到, 但是要想查出通信的真正起点和终点,必须知道整个通信链路上所有服务器的入站和出站通信细节,而这基本是不可能实现的。
PySocks 是一个非常简单的 Python 代理服务器通信模块,它可以和 Tor 配合使用。
1 | import socks |
如果你想在 Tor 里面用 Selenium 和 PhantomJS,不需要 PySocks,只需要增加 service_args 参数设置代理端口。
1 | from selenium import webdriver |
附录
robots.txt
1 | #Welcome to my robots.txt file! |